|
S.S. BEAVERFORD
Defensively Equipped Merchant Ship (D.E.M.S.)
S.S. BEAVERFORD, which was part of convoy HX.84, was sunk with all hands on 05 Nov 1940 by the German Pocket Battleship Admiral Scheer.
Ship's Master
Captain Hugh Pettigrew
They shall not be forgotten
Article on the loss of the BEAVERFORD The Evening Standard date - approx 3 years after the sinking of the JERVIS BAY and BEAVERFORD Click on the above image to view the whole article
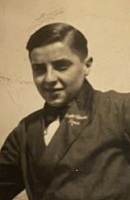
Courtesy of Scott Charnick - Great-nephew of Seaman Leslie Bowie
The Legend of the Beaverford - Fact or Myth
Below is a write-up on the SS BEAVERFORD and Convoy HX-84. This write-up is found on various sources on the internet, including Wikipedia. This is followed by research by emeritus Professor Michael Hirst (posted below "The Legend of the Beaverford") shows that this write-up, while factual in that the BEAVERFORD was sunk by ADMIRAL SCHEER, contains information that does not match historical records.
The Legend of the Beaverford:
"S.S. Beaverford was a Canadian Pacific Steamship Company cargo liner. Beaverford was the first of five cargo ships built by Canadian Pacific in 1927 and 1928 including sister ships Beaverdale, Beaverburn, Beaverhill and Beaverbrae. Designed to carry 10,000 deadweight tons of cargo as well as 12 passengers, they were fitted with 80,000 cubic feet of insulated cargo space and 20,000 cubic feet of refrigerated cargo spaces for meat and fruit. Their twin screws were powered by six Parson steam turbines and were among the most efficient steam engines of their time. Their boilers were fitted with Erith-Roe mechanical stokers, the first automatic stokers in the British merchant service.
With the onset of war, the fast and modern beaver ships were requisitioned by the British Admiralty to carry high-value stores. Beaverford was fitted with two guns for self-defence, a four-inch gun on the stern and a three-inch gun on the bow. She remained owned by Canadian Pacific with a Merchant Navy crew, along with two with two DEMS gunners. Beaverford sailed from Halifax, Nova Scotia on October 28, 1940 as part of Convoy HX-84.
Convoy HX-84 was half way across the Atlantic when it was located and attacked by the German heavy cruiser Admiral Scheer on November 5. The attack began at 17:15. The convoy’s only escort, the Armed Merchant Cruiser HMS Jervis Bay ordered the convoy to scatter. In an engagement that won the commander of Jervis Bay a posthumous Victoria Cross, the escort steered directly towards Admiral Scheer. Hopelessly outgunned, Jervis Bay was set afire and sank 22 minutes later. Admiral Scheer now began to attack the convoy, first sinking the SS Maidan with all hands. The tanker San Demetrio was set on fire, but did not sink. ‘‘Admiral Scheer’' next sank the freighters Trewllard and Kenbane Head.
Captain Pettigrew aboard Beaverford had begun to scatter but as he watched Admiral Scheer close on Kenbane Head, he ordered Beaverford to turn and engage the German heavy cruiser. Beaverford opened fire with her 3-inch bow gun. The first shot landed unexpectedly close to the German heavy cruiser. Admiral Scheer turned all its attention to this unexpected challenge firing star shells to illuminate Beaverford as darkness had now fallen. Beaverford turned to bring both of its two small guns to bear and fire at the German cruiser although neither gun was in range. Beaverford sent out a wireless message as it engaged the German cruiser, “It is our turn now. So long. The captain and crew of SS Beaverford”.
Admiral Scheer opened fire on Beaverford with its 11-inch guns. However Beaverford used the reserve power of its turbine engines to quickly turn and evade the fire as the shots landed in the water, missing Beaverford although the shrapnel started small fires on amidst her deck cargo. The ships of the dispersing convoy had laid a thick smoke screen from floating smoke floats and Beaverford was able to disappear into the smoke screen. Admiral Scheer, its radar broken from the prolonged bombardment of Jervis Bay had difficulty in locating the new challenger in the smoke and darkness. Beaverford, one of the faster ships in the convoy, had a chance to escape in the darkness, but for reasons unknown, Captain Pettigrew stayed to fight it out with Admiral Scheer. For the next four hours, Beaverford played a cat-and-mouse game, emerging from the smokescreen to fire at Admiral Scheer and then seeking cover into the smoke. Captain Theodor Krancke in command of Admiral Scheer had identified Beaverford as “Target No. 9” and thought he had destroyed the freighter, only to find it the ship reappearing to confront him again.
However every time Beaverford emerged from cover, the ship was hit by Admiral Scheer's firepower. In all Admiral Scheer fired 83 shells at Beaverford, 71 from its 5.9-inch guns with 16 hitting the unarmoured freighter, and 12 from the cruisers massive 11-inch guns with three making hits. Beaverford began to take on water and slow. Fires spread on the freighter making it easier for the enemy guns to find their mark. Finally at 22:45, Admiral Scheer was able to destroy Beaverford with a torpedo. The torpedo hit the fore part of Beaverford, lifting the bow and detonating the ammunition in her hold. The ship blew apart and the stern was last seen sliding into the ocean. All aboard were killed in the sinking. Beaverford had taken up the fight with Admiral Scheer for almost five hours. Delayed by Beaverford, the German cruiser was only able to find and sink one more ship from the convoy, SS Fresno City. Of the 38 ships in the convoy, Admiral Scheer had only succeeded in sinking six. (Source: Wikipedia)
The Legend of the Beaverford - Fact or Myth - submitted by Michael Hirst
The legend of the SS Beaverford and her supposedly ‘heroic defence’ of Convoy HX84 first appeared in a Scottish newspaper in 1944 and was elaborated on in a book by Bernard Edwards, "The Convoy will Scatter", currently published by Pen and Sword Maritime. It is reproduced on several websites, and is passed off as fact. But I prefer to call it a legend, or a myth.
The timings of the sinkings also contradicts the usual accounts. The Beaverford was the last but one ship to be caught. The Kenbane Head was sunk less than an hour before (and according to Krancke, did put up a brief fight, even when burning fiercely) and the Fresno City was shelled and left ablaze just over an hour later There is no room in those timings for any five hour (or one hour, or 30 minute) fight with the Beaverford. The Fresno City’s captain's log recorded that they saw the Beaverford attacked, bearing X degrees SSE, 10 miles distant, but again there is no mention of any fight back.
In summary:
No disrespect to the men who died aboard the Beaverford. They were no doubt brave men who did their duty to the end, but after the captain and crew of the Jervis Bay, the real hero of the night was surely the captain of the Swedish freighter Stureholm, who with the agreement of his entire crew disobeyed standing orders and went back to rescue the Jervis Bay survivors.
|